Braids and twists offer a stylish look, but they also serve as protective styles for natural hair, reducing manipulation and preventing damage. From the classic three-strand to cornrows, the possibilities are endless when it comes to styling with braids.
One particularly versatile form of braiding is twist braids, a timeless and chic look. This protective style can worn by any hair texture or length and has become a go-to choice for many seeking a low-maintenance yet stylish look. Here’s everything to know about this style.
What Are Twist Braids?
Twist braids are a hairstyle where two strands of hair are twisted around each other to form a rope-like pattern. Unlike traditional three-strand braids, twist braids require only two sections of hair to create a sleek, twisted look. You can use natural hair or hair extensions and offers different variations, including two-strand twists, Senegalese twists, Marley twists, and flat twists. They can be styled in different ways, from thick and chunky to small and delicate. The style offers a lot of flexibility.
Twist braids are particularly popular due to their versatility, as they can be styled for both casual and formal occasions, and they give the hair a break from heat styling and chemical treatments. Whether you’re looking for a protective style, a way to add volume and length, or simply a trendy look, twist braids are an excellent choice that continues to grow in popularity.
How to Do Twist Braids
Whether you’re a beginner or experienced, creating twist braids at home is easy with the right technique.
Materials Needed
- Hair extensions: If you want your twists to be fuller or longer, you can use synthetic or natural hair extensions.
- Leave-in conditioner: This helps keep your natural hair hydrated while twisting.
- Rat-tail comb: For parting your hair into neat sections.
- Hair clips: To hold sections of your hair while working.
- Styling gel: To smooth the hair and prevent frizz while twisting.
- Scissors: For trimming excess hair or any uneven edges.
- Edge control: For smoothing edges and flyaways.
- Hair oil: To add shine and seal in moisture once your twists are finished.
Twist Braids Tutorial
- Prepare Your Hair: Start by washing and conditioning your hair to ensure it’s clean and manageable. Apply a leave-in conditioner or moisturizing cream to hydrate and detangle your hair. You can also apply a heat protectant if you’re planning to blow-dry before twisting.
- Section Your Hair: Use a rat-tail comb to create small, even sections in your hair. The size of the sections will determine the thickness of your twists. For smaller, more delicate twists, use smaller sections; for thicker, chunkier twists, use larger sections. Clip the sections away so they don’t get in the way as you work.
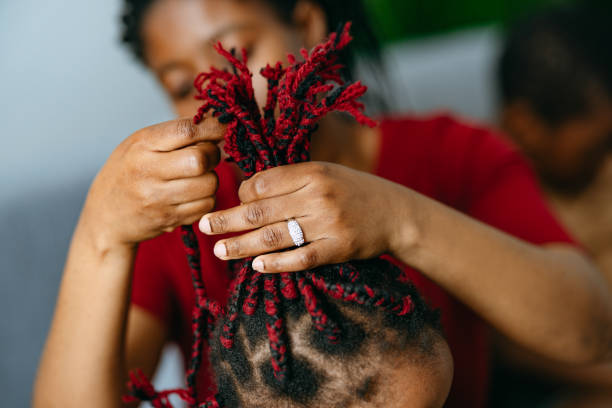
- Start Twisting: Take one section of hair and divide it into two equal parts. Hold one part in each hand. Begin twisting the two sections around each other, starting from the root to the ends. Be sure to twist tightly but not too tight, as this could lead to discomfort or breakage. If you’re using extensions, add them by holding the extension hair together with your natural hair at the root and twisting them together.
- Continue Twisting: Continue twisting down the length of your section until you reach the ends. Secure the ends of the twist with a small elastic band or a bit of styling gel. If you’re using extensions, then you may need to use the crochet method. You can also continue twisting until the extension is fully blended with your natural hair. Continue the same process for all the sections of hair, ensuring each twist is neat and uniform.
- Trim and Style: Once all your twists are complete, trim any excess hair or uneven ends. Apply a small amount of edge control or hair gel to smooth your edges and reduce flyaways for a polished look. For long-lasting twists, you can apply a light mist of hairspray or setting spray. You can also apply some hair oil for added shine and hydration.